Arena:Crypt of Hearts
|

Quick Walkthrough[edit]
- Sleep and receive a vision from Ria Silmane.
- Travel to High Rock and meet with the Brotherhood of the Seth.
- Go through the Mines of Khuras to acquire a map to the Crypt of Hearts.
- Have the Brotherhood decipher the map to learn exactly where the Crypt is.
- Retrieve the sixth piece of the Staff of Chaos from the Crypt.
- Repel another attack by Jagar Tharn.
Detailed Walkthrough[edit]
Sleep and Dream[edit]
Go to sleep again and Ria Silmane will speak to you:
"It has become a habit, congratulating you on your success. Still, there are three pieces left, and what guards them only the Divine Lady may know. I have spent many a day searching the ethereal planes for some clue as the location of the sixth piece of the Staff. This is what I have found. The piece was sent to a place called the Crypt of Hearts. I have no clue as to the location of such a place. The price for the little knowledge I have was... exacting. Still, only three provinces remain that can hold these last pieces. It can only lie in one of these. Good luck..."
Camlorn, Part 1[edit]
Asking around about the Crypt of Hearts leads you eventually to the Brotherhood of Seth in Camlorn, High Rock. There you are told by Halfas Varn that one of their junior members went mad, talking about how the Emperor was kidnapped and he needed the Staff of Chaos to free him. He fled with a map telling them where the Crypt is, and they know where he went. If you agree to get the map back, they mark the location of the Mines of Khuras on your map.
Mines of Khuras[edit]
The mines are located a short way southeast of Camlorn. This is a bi-level dungeon with huge levels. Upon entering, you will receive a message:
- The sulphuric air of the Mines of Khuras hits you like a wall of heat, bringing tears to your eyes. Through the shimmering air you can see numerous lava flows and pits that lie scattered about the scorched ground, treacherous and deadly...
- Around you lie pools of seething lava welling up
- from deep below and releasing their gases into
- the air, which seems tainted but breathable...
Near the entrance, you will also find a dead body with a clue as to where to go next:
- This body you surmise is that of an unlucky
- adventurer. The flesh seems torn, and perhaps
- chewed. Scrawled in blood on the floor next
- to it are the letters, 'SW'...
You will find lava in abundance as well as magic-, fire-, and shock-throwing monsters, so ensure that you have plenty of defensive magic (potions, spells, or magic items) on hand. Because spell-throwing monsters can kill you while you're climbing out of a pit, it's also very helpful to have Levitation so you either stay out of pits or, if you end up in one, don't have to laboriously climb out.
On the first level, the way down is more or less in the center of the dungeon. Levitation is a big help in negotiating the puddles of lava that are abundant here. You could jump over them, but it's often difficult to do that without landing in another flaming puddle on the other side. Throughout the level you may receive various messages, apparently clues left behind by the Brother Barnabas:
- Scratched into the wall here is a short message,
- Ware the Emperor. His minions await me.
- A strange message to find within these depths...
- -
- Scratched into the wall here is a strange message,
- The secret of the Staff is mine. The wicked shal-
- The writing ends abruptly, as if the writer was suddenly interrupted...
The fastest way down is to head west in the first east-west corridor and take the first opening south. Immediately work your way a short bit back east, then go south quite a way. Eventually you should see the blue dot that shows you where to go down (51,58); it'll likely be a bit east of where you're going south.
Upon accessing the second level, you will receive another message:
- You enter the bowels of the Mines, aware that
- all around you lie creatures that have come
- to call this forsaken place their home...
- -
- There is an absence of light in the area, only
- adding to the forlorn feeling of abandonment...
While it thankfully has little lava, this level has pits a-plenty and not a few tunnels; it is very maze-like, dark, and difficult to navigate. You can find the map fragment (and what's left of Brother Barnabas) in the southeast (the small room above the 'BLACKMARSH' tunnels) of the level (21,86). Here, collect your prize:
- You have found the Map fragment, only slightly discolored by Brother Barnabas' blood. With the help of the Brotherhood of Seth, you may succeed where Barnabas failed…
Your best bet to get out of the dungeon quickly is to take the trench south of where you entered to where it comes out, then make your way south and east as best you can.
Camlorn, Part 2[edit]
Back at the Temple, return the map and the brothers will mark the location of the Crypt of Hearts on your map.
Crypt of Hearts[edit]
"The chill of death seems to touch your heart as you gaze upon the stone walls of the Crypt of Hearts. Above the entrance stands a grinning skull, a warning to those who would traverse the halls of the dead. You can sense the sixth piece of the Staff of Chaos, somewhere below..."
As you enter the crypt:
- You stand in the Crypt of Hearts, a world of darkness
- and death. The air is still, decayed with age, and the
- smell of sulphur pervades the air. A hot wind seems to
- be coming from around the corner, to the south...
This is a four-level dungeon. The first level is quite large, though the lower levels are smaller. Every type of undead are plentiful here, as you might expect. There is also a large number of the most deadly of monsters, the stone golem. This dungeon is easily the most difficult so far, and the fourth level is especially challenging. Passwall is particularly helpful here, because many of the levels offer a shortcut to the exit if you have it. Bring as many Potions of Heal True as you can. A couple of Potions of Invisibility can protect you from the stone golems of the bottom level, which might not spot you right away. Resistance potions and a lot of Potions of Levitation will be beneficial too. The dungeon doesn't really offer much treasure, even if you'll find dead bodies from time to time, sometimes including nice magical items.
The way down on the first level is in the north center of the level. Make your way west while staying as far north as possible and you'll quickly find it. This level also holds another chance to meet your first vampire, if you didn't meet one already in the Crystal Tower (he will be located in the half-circle room in the center of this floor). Mind the fields of lava around the place, there are usually floating rocks to allow you passage but a levitation spell will always come in handy. Throughout this first level you may explore various locations hidden past the fields of lava, usually containing treasure and signaled by messages popping up on the screen to inform you of this:
- This large room is filled with a seething pool of lava.
- In the distance can be seen many floating blocks,
- held up by some sort of magic. Perhaps the field of
- fire may after all be safely traversed...
- -
- On the other side of the lava run are temple walls with inscriptions that seem to twist your very thoughts towards baser instincts The smell of death lingers in the hot air. Drums can be heard in the distance...
- -
- You come upon a strange sight. Humans have evidently been
- killed, each next to a small guttering candle. In the
- center of this bizarre sacrifice stands a closed crypt
- made of heavy stone...
- -
- In the middle of this sea of lava stands a temple. You can
- see its rune incripted walls shimmering in the heat...
Finally, upon reaching the stairs down the second level:
- You stand near the stairs leading down further into this
- crypt of the dead. A cold air gusts from the opening,
- bringing with it the smell of decaying flesh...
The second level is quite small in terms of actual area to explore. The way down is in the southwest section. If you have Passwall and don't want to explore, it's worth cutting your way south immediately, skirting the pit of floating floor tiles, and then making directly south for the way down. Otherwise make your way east down the long corridor on the north section, then back west as you can. As you enter the next level, you are warned:
- You enter the third level of the Crypt of Hearts.
- The walls are covered with a sticky, foul smelling,
- mucus-like substance. In the distance can be heard
- screams of agony...
Throughout, you may receive other such messages, including:
- A foul wind passes by...
- -
- From somewhere comes the smell of sulphur, and along with it a blast of hot air...
The third level is also small. Again, if you have Passwall and don't want to explore, getting to the way down is a snap; you can probably see the blue dot on the map as soon as you enter the level. Cut through the wall right behind where you entered. If you don't have Passwall, you'll have to go a way north and east, then down a very long corridor south and, eventually, back west.
As you go even deeper into the crypt,you receive another message:
- You stand in the tombs of heroes long dead. A low moan can be heard through these vaulted corridors.
The fourth level is larger and more problematic. It is heavily pocked with trenches and pits, so Levitation is an enormous help, particularly when having to deal with the very dangerous (especially while distant) stone golems and wraiths. The Staff piece is in the center of the level, within a Temple in the center of the room, as the game will let you know soon enough:
- You can see what looks like a large crypt or temple far in the center of this room of chasms...
If you have Passwall, you can immediately head north, cut through the east wall, and instantly find yourself in the area where the Staff piece room is. This is highly recommended; also use invisibility to get through to the Staff piece room without being attacked. Otherwise, you are in for a long trek east, then a long trek north, then a long trek west, then a shorter trek south before you can get into that area. Once in that area, there are more fell beasts and automata, plus of course a riddle-locked door:
- Few have gained these hallowed halls,
- Brave fools who wouldst face the puzzle...
- -
- There is a thing, which nothing is,
- Yet it has a name.
- It's sometimes tall
- And sometimes short
- It tumbles when we fall
- It joins our sport,
- And plays at every game...
- -
- What then, doth I speak of?
The possible answers are "Shadow", "A Shadow", "My Shadow" and "Your Shadow". A correct answer opens the door and gives you a message:
- Thou art correct mortal. Proceed to thy fate...
Unlike other dungeons, you won't experience negative consequences by answering incorrectly, just a different message:
- Think again, then speak with wisdom...
As you enter the room, you see the Staff Piece (30,32 you were looking for, guarded by two Fire Daemons. Take care of them or avoid them and take the Staff piece (30,32).
- The sixth piece of the Staff of Chaos slides into the nearly complete rod like a sword into a sheath…
Ambush[edit]
After arriving back in town, Jagar Tharn will send a monster to kill you and a vision to warn you:
"You have rejected my offer of everlasting life, and defeated the Crypt of Hearts. Your list of accomplishments grow. You will not however, accomplish the forging of the Staff. My forces are inexhaustible, and you will succumb. Prepare, for my servants arrive..."
Notes[edit]

- The map of the Mines of Khuras second level contains an easter egg: the maze in the southeast corner spells out "BLACKMARSH" in mirror writing. There are also smiling faces on the third level of the Crypt.
- If you've ever wondered what the Arena Void looks like, your only chance at this point is to break through the walls on the fourth level of the Crypt of Hearts. Try the very thin east wall. All other dungeons are ringed by an impassable wall except for the Imperial Dungeons. You could therefore also break through the Imperial Dungeon walls into the Void, but it can be quite difficult to get Passwall capability down there, and anyway, you'd have to start a new character to even try. Touching the void while looking back at the level makes all walls disappear.
•In the first level of the Mines of Khuras to may receive a clue as to the origins of the place exploring it for treasure:
- It seems that the rumors of Dwarven treasure were
- accurate. The mounds of gold and items in this room
- twinkle in the flickering torchlight...
- Upon finding his body, you may find out about Barnabas' tragic fate:
- This body is obviously that of Brother Barnabas.
- His body has been ravaged by the denizens of this
- underdark and his face etched into a mask of pure
- terror. Just beyond the body you can see what looks
- to be a map...
And next to be body...
- On the floor here you find a journal. The book seems
- torn and tattered, with only one page still legible,
- -
- The dreams continue. I know not their import, but
- something must be done, else the Empire will surely
- perish. Perhaps I am mad, I know not. I will begin
- searching for the map in the SE section of these
- mines, then continue west along the southern wall.
- I pray that I am not too late...
- Obviously this journal was penned by Brother Barnabas..

- A mausoleum with an inscription can be found within the Crypt of Hearts: "You stand near a mausoleum. A runic inscription reads, "Sir Culanthir - May he at last rest." The years seem to have rusted this iron gate shut. Even the ground is undisturbed. Your footfalls kick small clouds of dust that hang in the still, dead air." Apparently, Sir Culanthir is a vampire that inhabits the mausoleum.
Maps[edit]
-
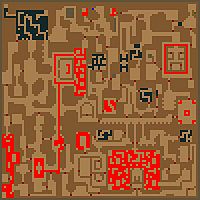
First Level
-
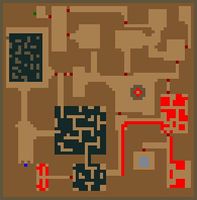
Second Level
-
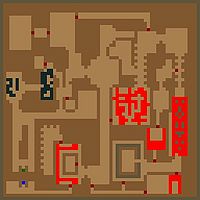
Third Level
-
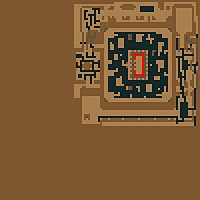
Fourth Level


Quest Log[edit]
| Crypt of Hearts () | ||
|---|---|---|
| Stage/ Index |
Finishes Quest | Journal Entry |
| 0 | (Date): Camlorn's Brotherhood of Seth have marked on your High Rock map the Mines of Khuras... | |
| 1 | (Date): Marked on your continental map are the halls of the dead, the Crypt of Hearts, in High Rock... | |
| Prev: Crystal Tower | Up: Main Quest | Next: Murkwood |